Drills 1 through 8 are available at the Home page
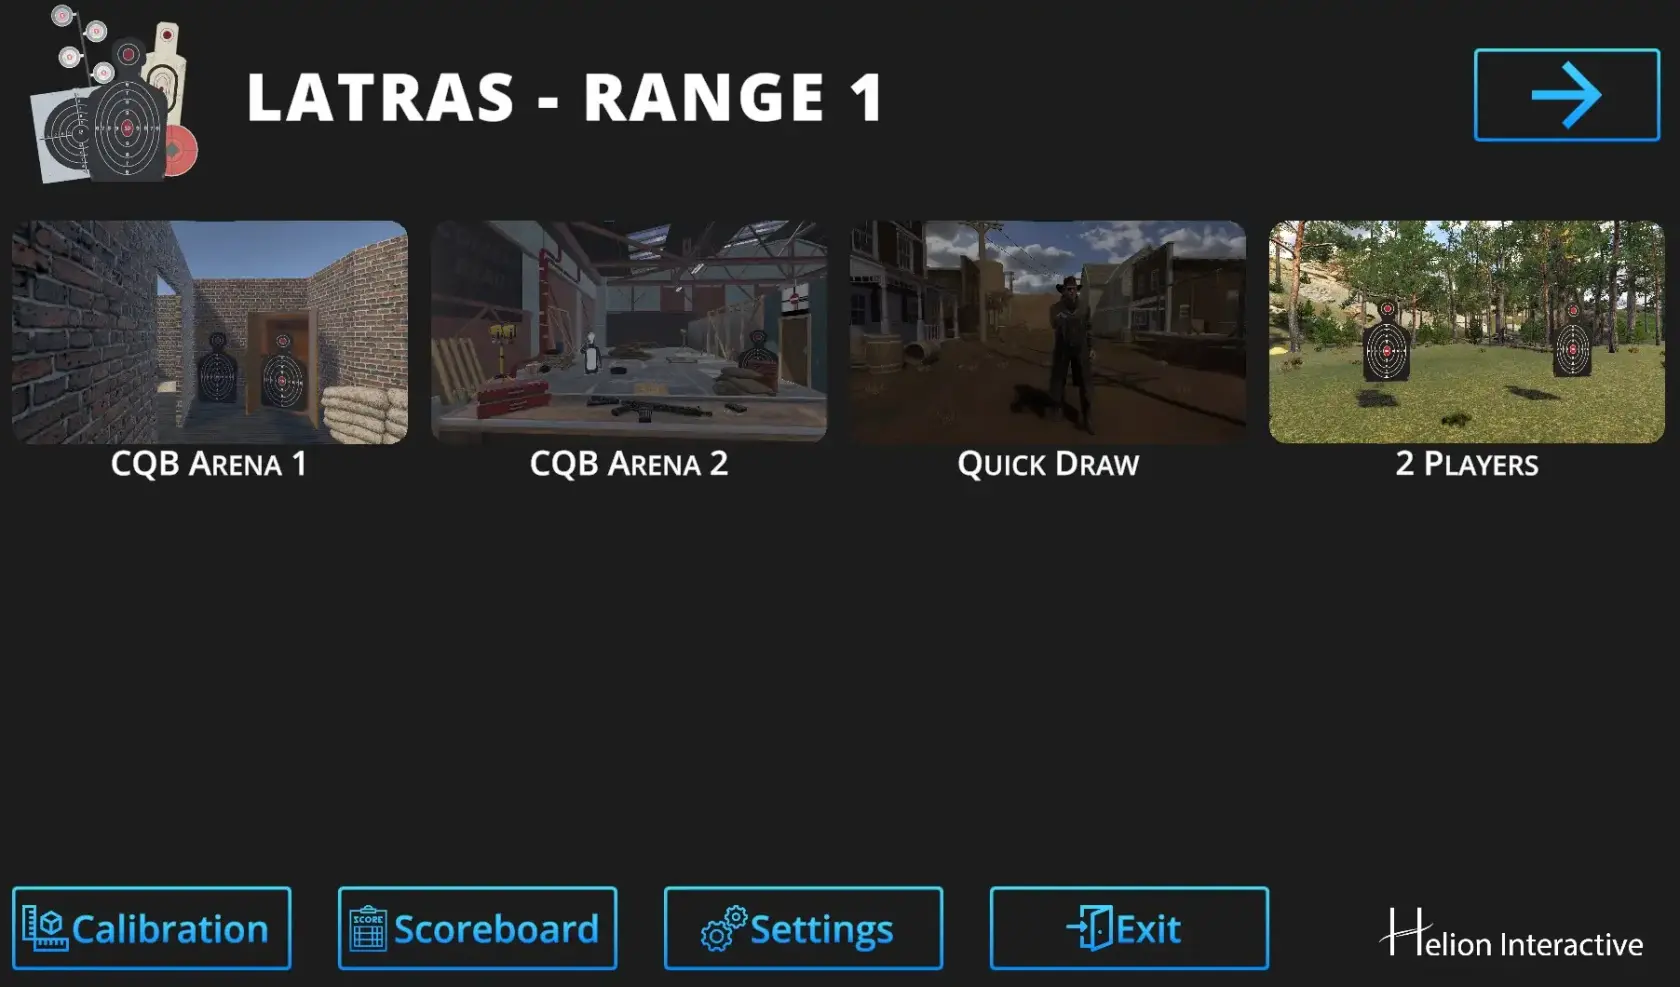
[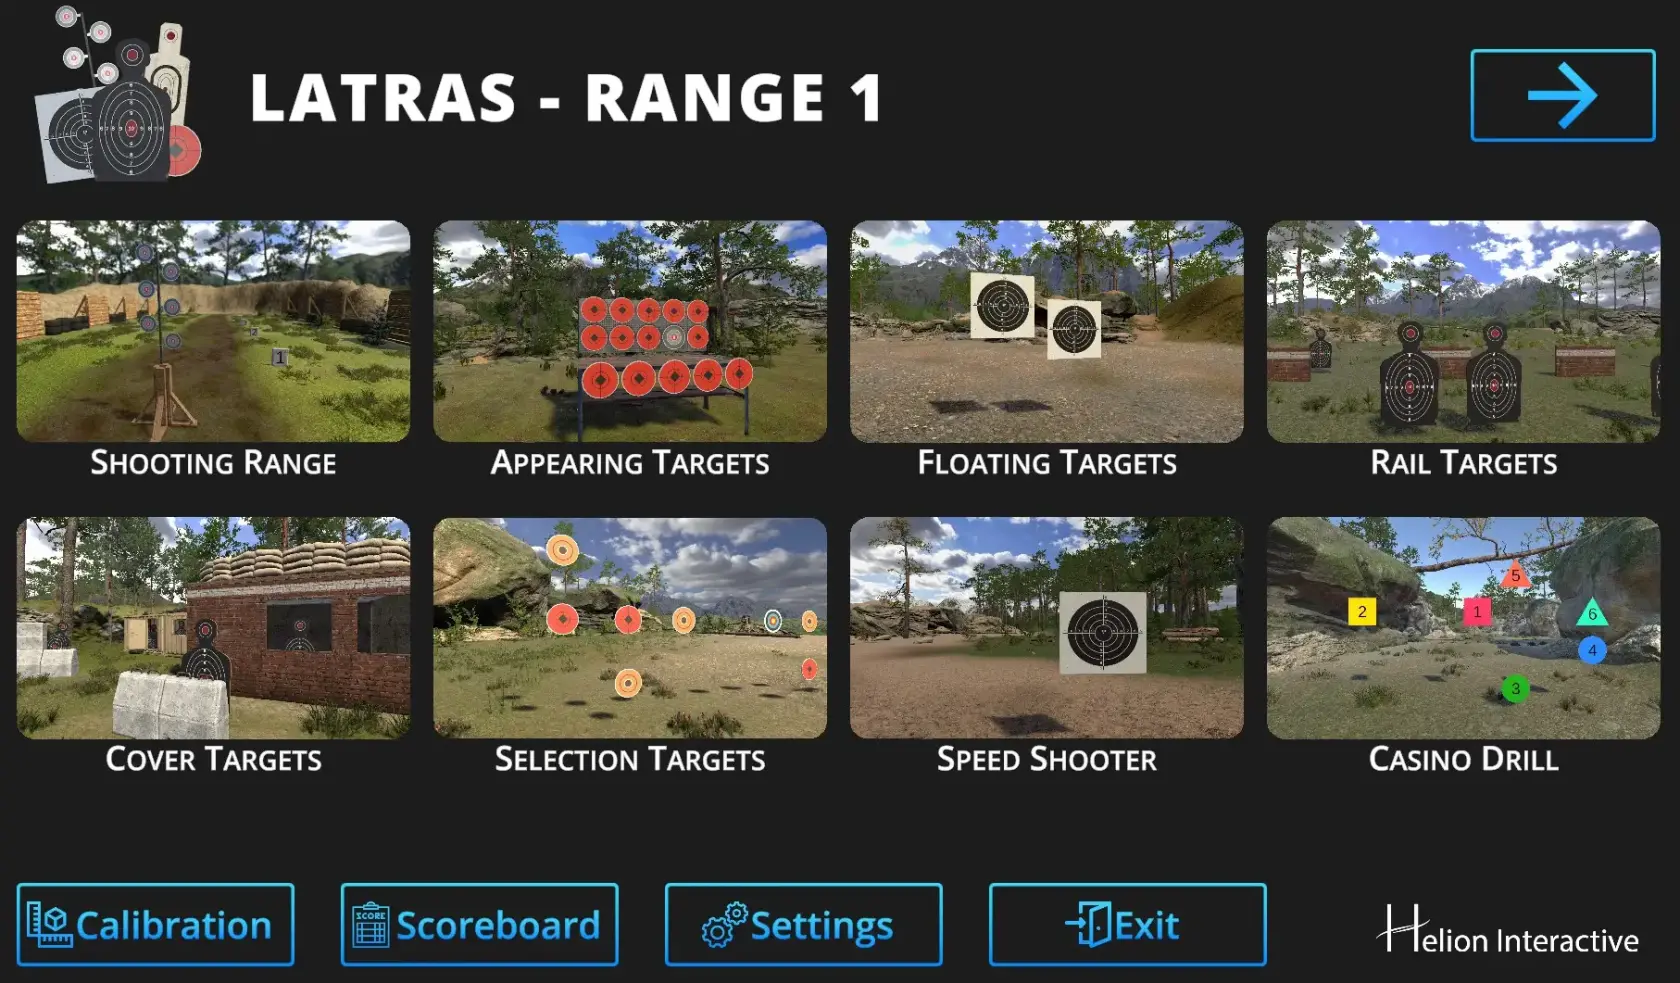](https://docs.helioninteractive.com/uploads/images/gallery/2025-07/range1homepage1jpg.webp)Drills 9 through 12 are available after clicking an arrow in the upper right corner
[](https://docs.helioninteractive.com/uploads/images/gallery/2025-07/range1homepage2.webp) For Calibration details see [Calibration](https://docs.helioninteractive.com/books/range-1/page/calibration "Calibration") For details about Scoreboard see [Scoreboard](https://docs.helioninteractive.com/books/range-1/page/scoreboard "Scoreboard") For setting details see [Settings](https://docs.helioninteractive.com/sett) --- # SettingsThe main Settings dialog is accessible from the Home Page.
--- [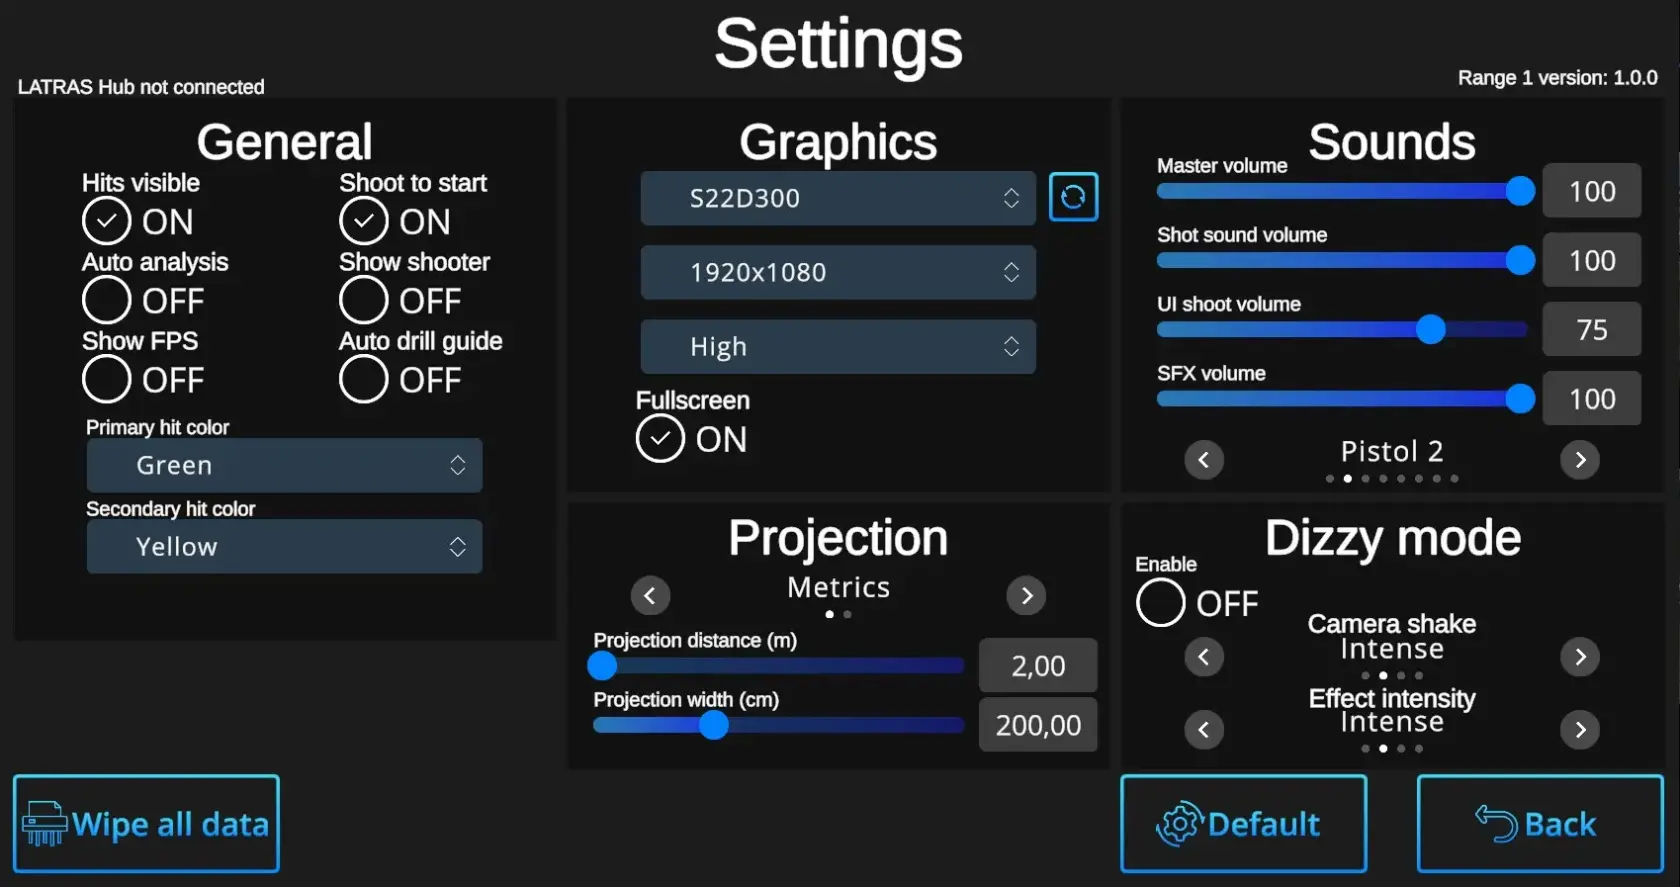](https://docs.helioninteractive.com/uploads/images/gallery/2025-07/vtJsettingsdialog-webp.webp)**General Settings:**
**Hits Visible** ON/OFF: ON – Hits are marked with a dot. OFF – Hits leave no visible mark, but are still recorded by the system and can be reviewed later in the Analysis, where hit locations will be displayed. **Auto analysis** ON/OFF: ON – The system automatically runs the analysis after completing each drill—except for the Shooting Range, where basic shot information is always displayed in the upper right corner, and deeper analyses can be initiated manually using the 'Analysis' button. [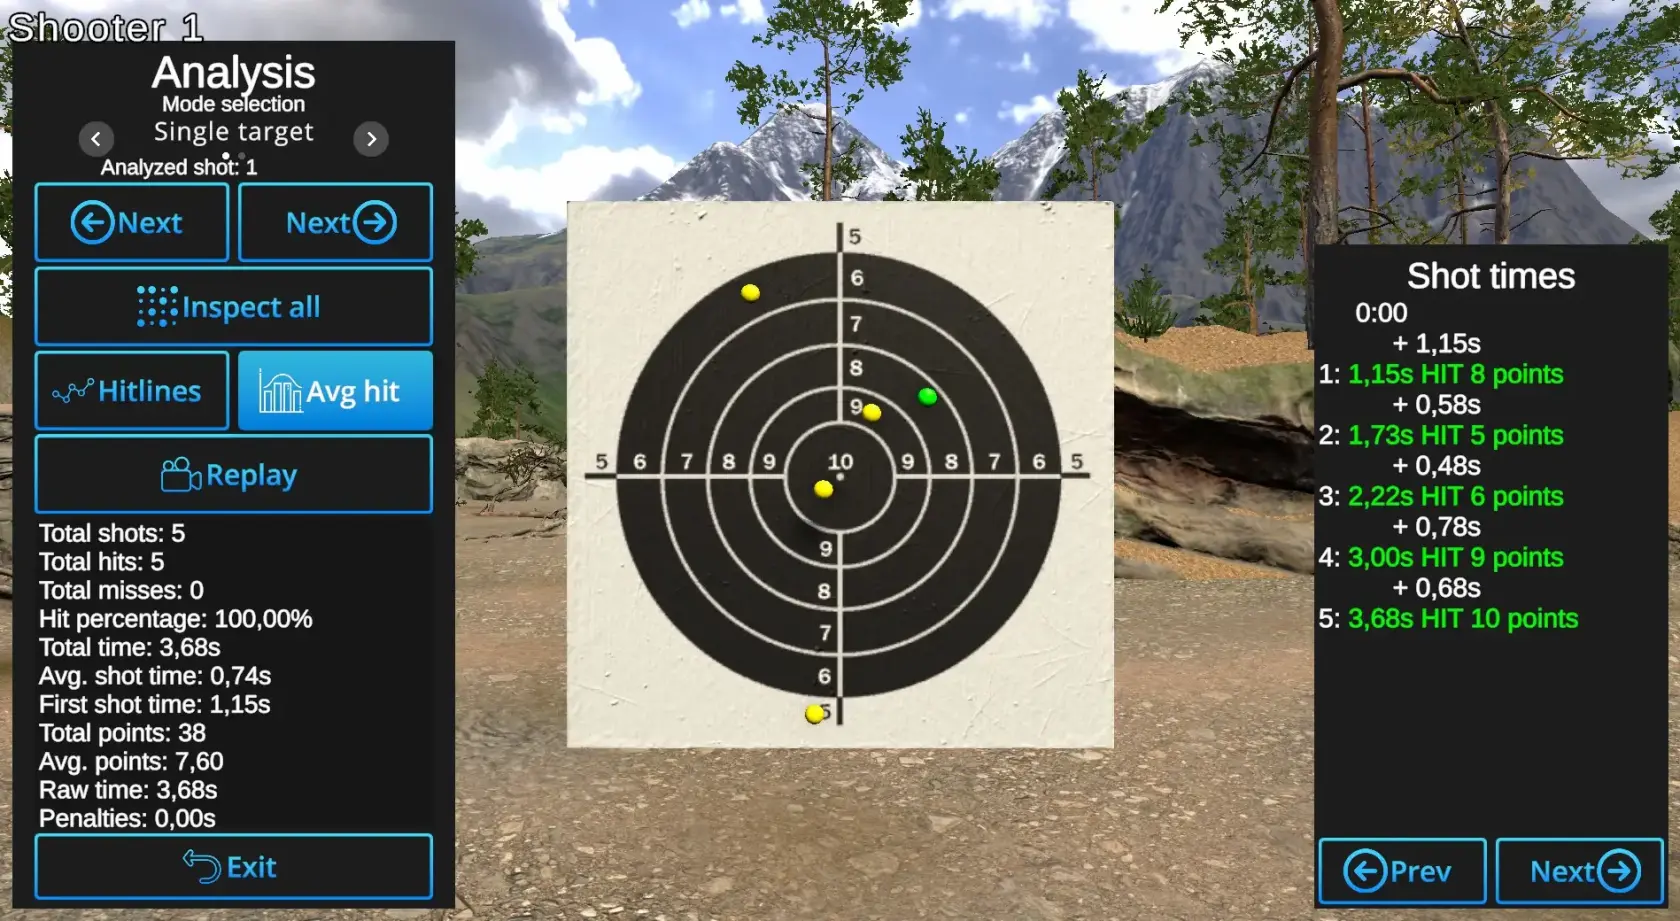](https://docs.helioninteractive.com/uploads/images/gallery/2025-07/analysis-webp.webp) OFF – Only the End menu will be prompted after each drill. The Analyses can be started by prompting the Analysis button. [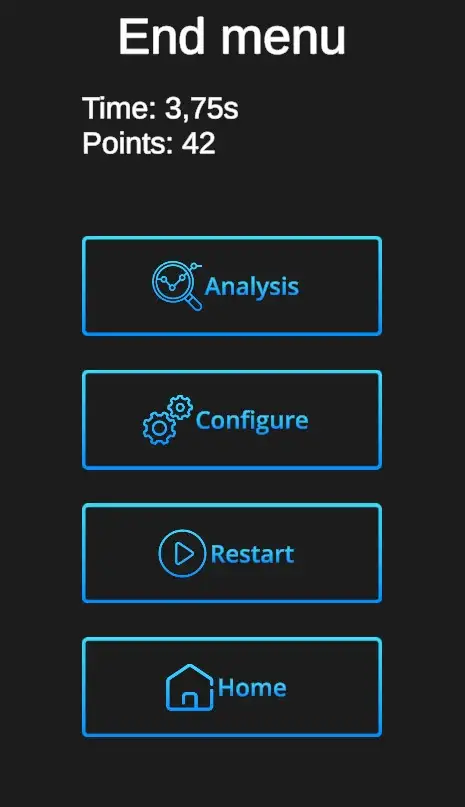](https://docs.helioninteractive.com/uploads/images/gallery/2025-07/vgTendmenu-webp.webp) **Show FPS** ON/OFF: Prompts ON / OFF the visibility of the current Frames Per Second ratio. ON - It appears in the upper left corner under the Player information. OFF - No information. **Shoot to start** ON/OFF: ON - Each drill can be started by firing to any place on the screen. (Recommended setting) OFF - Each drill can be started only by firing at the Start button. **Show shooter** ON/OFF: ON - Shooter information appears in teh upper left corner, e.g. Shooter 4. This setting is recommended for practise of multiple shooters. OFF - No shooter information apperas on the screen. This setting is recommended for a single shooter practise. **Auto drill guide** ON/OFF:| [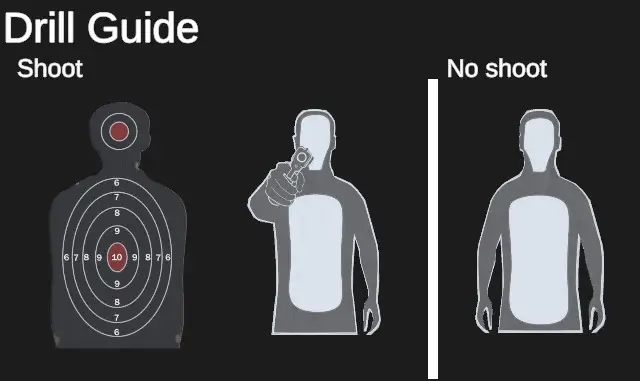](https://docs.helioninteractive.com/uploads/images/gallery/2025-07/cqbdrillguide.webp) | Drill guide appears at the beginning of each CQB drill, but only if the main setting -> Home-Settings-Auto drill guide control is ON. For experienced players Auto drill guide setting OFF would be satisfactory. |
| #### 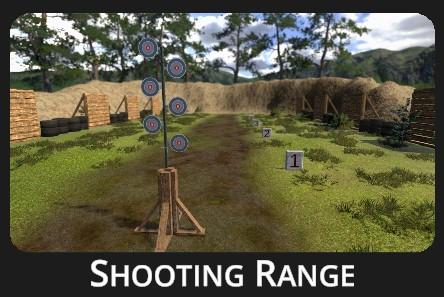 | ##### Features traditional shooting range with selection of stationary and movable targets at variable distances. ##### Ideal for mastering the fundamentals - basic shooting techniques including stance, grip, sight alignment, trigger discipline, precision, and breathing. |
| 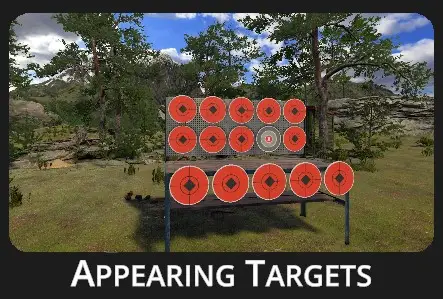 | ##### A simple yet effective marksmanship drill featuring a set of stationary bullseye targets positioned on a shelf. ##### Targets appear based on the chosen configuration, making it ideal for honing trigger control, aim, reaction time, and shooting speed. |
Drill description:
The drill features a set of targets arranged in three rows on a shelf. Depending on the selected configuration, the targets appear as Single, Multi, or with randomly appearing No-Shoot targets. Configuration options also offer various spawning speed options and time penalties.Configuration:
[](https://docs.helioninteractive.com/uploads/images/gallery/2025-07/appearingtargetsconfiguration.webp) **Difficulties** to be selected from: Custom, Easy, Normal, Expert - refer to [Difficulties](https://docs.helioninteractive.com/books/range-1/page/difficulties "Difficulties") **Target options:** Single Target: Only one target at a time appears. Multi Target: Multiple targets appear and can be shot in any order. No-Shoot Target: Orange No-Shoot Target may randomly appear during the drill. **Shelf distance**: Can be adjusted in the Custom difficulty level, other levels are preset. Values 0-1, where 0 is the closest, 1 the furthest. **Target count**: Number of targets to be shot in the drill. Can be adjusted in the Custom difficulty level, other levels are preset. (Easy 5 shots, Normal 10 shots, Expert 15 shots). **Default**: In one click resets the scene to default Appearing Targets setting - Normal difficulty + single target. **Home**: Directs back to the Home page with drill selection. **Start**: Starts the drill. Note that the drill can also be started with a random shot at the scene. If it doesn't start at a random shot, go to Home page, open the Settings dialog, and check General setting 'Shoot to start' ON. # Floating Targets| [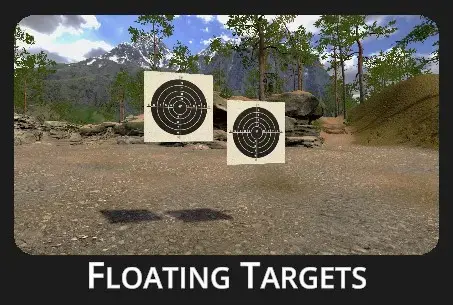](https://docs.helioninteractive.com/uploads/images/gallery/2025-07/floatingtargetsheader.webp) | ##### This drill tests your reflexes and accuracy under pressure. It pushes you to hit every target quickly and cleanly—misses aren’t an option. ##### It builds precision, speed, and decision-making—key skills for both competitive and tactical shooters. |
Drill Description:
Targets appear at a fixed distance, either hanging or floating within the scene. The objective is to eliminate all targets as quickly as possible without missing a shot. Points are awarded based on accuracy. To increase the level of competitiveness, activate the Penalties ON option—each missed shot will add a 1-second time penalty to your final score, pushing you to balance speed with precision. Depending on the selected mode, targets may appear all at once or one by one.Configuration:
[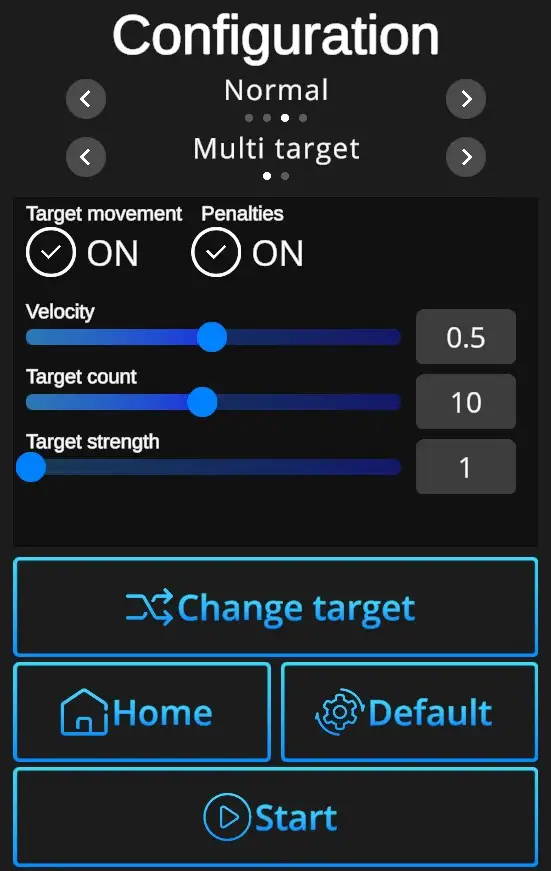](https://docs.helioninteractive.com/uploads/images/gallery/2025-07/floatingtargetsconfiguration.webp) **Difficulties** to be selected from: Custom, Easy, Normal, Expert - refer to [Difficulties](https://docs.helioninteractive.com/books/range-1/page/difficulties "Difficulties") **Target options:** Single Target: Only one target at a time appears. Multi Target: Multiple targets appear and can be shot in any order. **Target movement ON/OFF**: Selection of scene with either fixed (no movement) or floating targets (random movement, floating, overlapping targets). **Penalties ON/OFF**: Penalties ON will add 1 second to the drill time for every missed shot. Penalties OFF ignores the misses and records only elapsed time. **Velocity**: Can be set from value 0 (slowest) to 1 (fastest). Can be adjusted in the Custom difficulty level, other levels have the velocity preset. (Easy 0,2, Normal 0,5, Expert 1,0). **Target count**: Number of targets to be shot during the drill (1-20). Can be adjusted in the Custom difficulty level, other levels are preset. (Easy 7 shots, Normal 10 shots, Expert 12 shots). **Target strength**: Indicates number of hits necessary to remove each target. Standard setting is 1, custom setting allows up to 5 hits per target. **Change target**: Selects target type. **Default**: In one click resets the scene to default Floating Targets setting - Normal Difficulty + Multi Target + Target Movement ON + Penalties ON + Target Count 10 + Velocity 0,5 + Target Strength 1. **Home**: Directs back to the Home page with drill selection. **Start**: Starts the drill. Note that the drill can also be started with a random shot at the scene. If it doesn't start at a random shot, go to Home page, open the Settings dialog, and check General setting 'Shoot to start' ON. # Rail Targets| [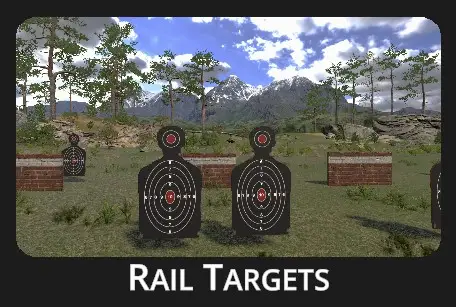](https://docs.helioninteractive.com/uploads/images/gallery/2025-07/railtargetsheader.webp) | ##### Dynamic drill with multiple movable targets. ##### The drill is designed to improve target acquisition, movement tracking, situational awareness, and shot timing. |
Drill Description:
This shooting drill features rail-mounted moving targets arranged across multiple rows. Each configuration introduces unique challenges, such as varying target counts, speeds, and strategically placed barriers that partially obstruct lines of sight. Shooters must quickly adapt—tracking targets through gaps and around obstacles while maintaining precision.Configuration:
[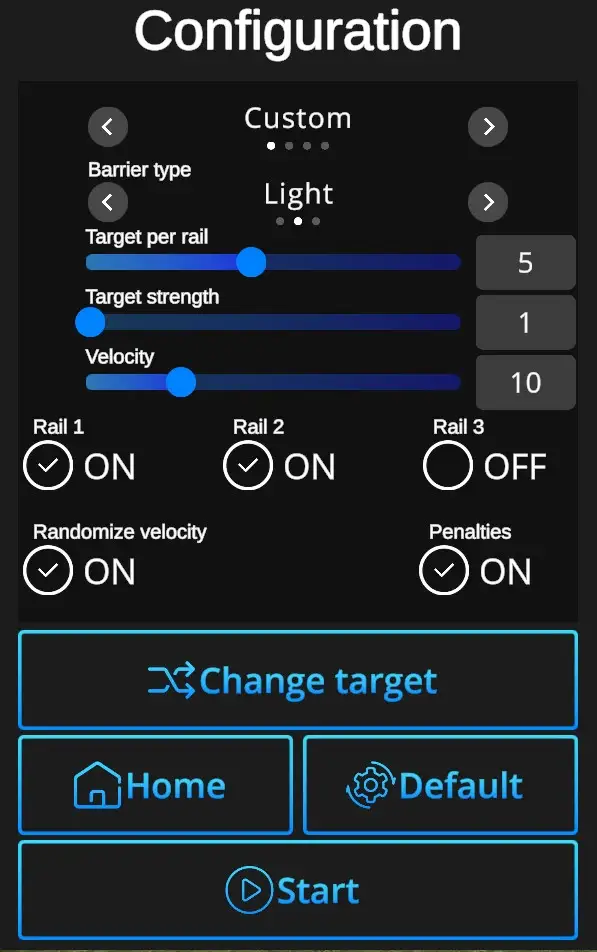](https://docs.helioninteractive.com/uploads/images/gallery/2025-07/railtargetsconfiguration.webp) **Difficulties** to be selected from: Custom, Easy, Normal, Expert - refer to [Difficulties](https://docs.helioninteractive.com/books/range-1/page/difficulties "Difficulties") **Barrier Type:** None, Light, Heavy **Target per Rail**: 1-10 **Target strength** : Indicates number of hits necessary to remove each target. Standard setting is 1, custom setting allows up to 5 hits per target. **Velocity**: Can be set from value 0 (slowest) to 1 (fastest). Can be adjusted in the Custom difficulty level, other levels have the velocity preset. (Easy 0,2, Normal 0,5, Expert 1,0). **Rail 1, Rail 2, Rail 3 ON/OFF**: Use a checkbox to specify the number of rails to display per scene. **Randomize Velocity ON/OFF**: ON Variable speed mode, OFF constant speed **Penalties ON/OFF**: Penalties ON will add 1 second to the drill time for every missed shot. Penalties OFF ignores the misses and records only elapsed time. **Default**: In one click resets the scene to default Rail Targets setting - Normal Difficulty + Light Target + Target per Rail 5 + Target Strength 1 + Velocity 5 +Rail 1 ON, Rail 2 ON, Rail 3 OFF, Randomized Velocity ON + Penalties ON. **Change target**: Selects target type. **Home**: Directs back to the Home page with drill selection. **Start**: Starts the drill. Note that the drill can also be started with a random shot at the scene. If it doesn't start at a random shot, go to Home page, open the Settings dialog, and check General setting 'Shoot to start' ON. # Cover Targets| [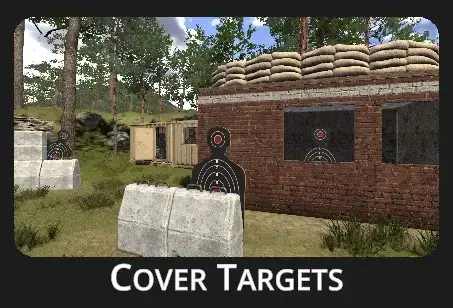](https://docs.helioninteractive.com/uploads/images/gallery/2025-07/covertargetsheader.webp) | ##### Abandoned storage buildings with targets appearing in various locations provide an ideal environment for training rapid reactions and precision. |
Drill Description:
Cover Targets is a shooting drill designed to improve reaction time, speed, and accuracy under pressure. In this drill, a set of targets emerges from behind cover in multiple cycles. To trigger the next cycle, the shooter must successfully hit all targets from the current one. The drill is finalized once all targets in the final cycle have been neutralized.Configuration:
[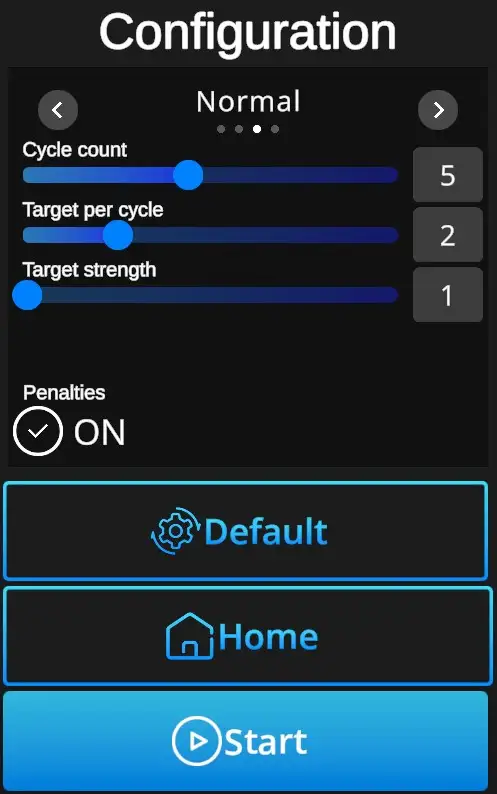](https://docs.helioninteractive.com/uploads/images/gallery/2025-07/covertargetsconfiguration.webp) **Difficulties** to be selected from: Custom, Easy, Normal, Expert - refer to [Difficulties](https://docs.helioninteractive.com/books/range-1/page/difficulties "Difficulties") **Cycle count**: Sets in how many cycles new targets appear (1-10). Each cycle must be finalized before the new one starts. **Target per cycle**: Number of targets to appear during the cycle (1-5). Can be adjusted in the Custom difficulty level, other levels are preset. (Easy 1 target, Normal 2 targets, Expert 2 targets). **Target strength**: Indicates number of hits necessary to remove each target. Standard setting is 1, custom setting allows up to 5 hits per target. **Penalties ON/OFF**: Penalties ON will add 1 second to the drill time for every missed shot. Penalties OFF ignores the misses and records only elapsed time. **Default**: In one click resets the scene to default Cover Targets setting - Normal Difficulty + Cycle Count 5 + Target per Cycle 2 + Target Strength 1 + Penalties ON. **Home**: Directs back to the Home page with drill selection. **Start**: Starts the drill. Note that the drill can also be started with a random shot at the scene. If it doesn't start at a random shot, go to Home page, open the Settings dialog, and check General setting 'Shoot to start' ON. # Selection Targets| [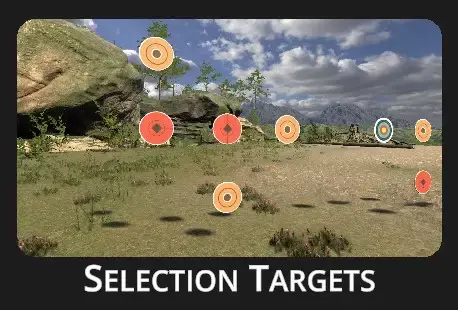](https://docs.helioninteractive.com/uploads/images/gallery/2025-07/selectiontargetsheader.webp) | ##### Static targets in different colors and patterns are uniquely arranged each round, challenging the shooter’s ability to quickly identify and hit the correct ones under time pressure. ##### This drill helps develop target recognition, decision-making under pressure, and precision shooting. It also reinforces visual processing speed and situational awareness. |
| [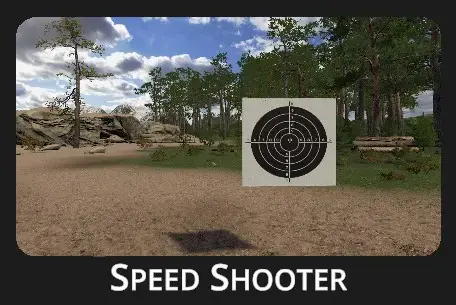](https://docs.helioninteractive.com/uploads/images/gallery/2025-07/speedshooterheader.webp) | ##### Ready - Set - Shoot ##### Ready - Set - Shoot ##### Ready - Set - Shoot ##### Simple, yet effective drill to sharpen quick target acquisition. Repetition makes masters! |
Drill Description:
A speed shooting drill is a training exercise designed to improve quick target acquisition, accuracy, and consistency at varying distances while operating under time pressure. At the beginning of the drill, a target appears on the screen in a different location each time, then remains stationary for the duration of the exercise.Configuration:
**[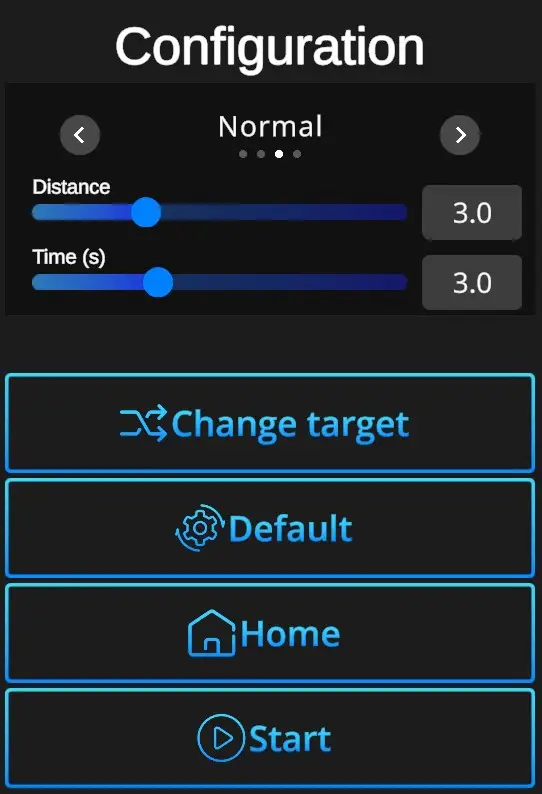](https://docs.helioninteractive.com/uploads/images/gallery/2025-07/speedshooterconfig.webp)** **Difficulties**: Custom, Easy, Normal, Expert - refer to [Difficulties](https://docs.helioninteractive.com/books/range-1/page/difficulties "Difficulties") **Distance**: Relative distance of the target (0,0-10,0). **Time**: Set duration of the drill (1,0-7,0s). **Change target**: Selects type o target - bullseye or silhouette. **Default values**: In one click resets the scene to default Speed Shooter setting - Normal Difficulty + Distance 3,0+ Time 3,0 + Bullseye target. **Home**: Directs back to the Home page with drill selection. **Start**: Starts the drill. Note that the drill can also be started with a random shot at the scene. If it doesn't start at a random shot, go to Home page, open the Settings dialog, and check General setting 'Shoot to start' ON. # Casino Drill| [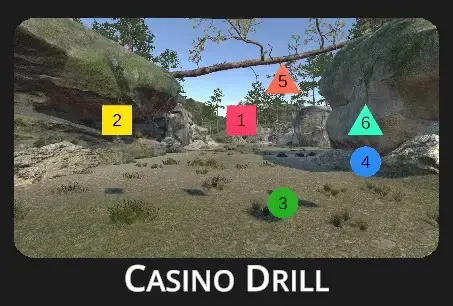](https://docs.helioninteractive.com/uploads/images/gallery/2025-07/casinodrillheader.webp) | ##### Shoot-by-number drill – quick target recognition required! Each sequence is unique, with varying target shapes, colors, and layouts. ##### This drill is designed to improve decision-making speed, focus, adaptability, and shooting precision under pressure. |
Drill Description:
The Casino Drill features targets numbered 1 to n, each with unique shape and color. Shooters must engage them in ascending numerical order with one shot per target. The shape, color, and number arrangement changes each run, challenging quick target identification, accuracy, and sequencing.Configuration:
[](https://docs.helioninteractive.com/uploads/images/gallery/2025-07/casinodrillconfig.webp) **Difficulties**: Custom, Easy, Normal, Expert - refer to [Difficulties](https://docs.helioninteractive.com/books/range-1/page/difficulties "Difficulties") **Target count**: Sets how many targets appear in one cycle (3-20). **Target size**: Sets the size of targets in decimal increments (0,5-1,2). Can be adjusted in the Custom difficulty level, other levels are preset. (Easy 1,2, Normal 1,0, Expert 0,7). **Endurance**: Sets required number of hits to remove the target. Can be adjusted in the Custom difficulty level, other levels are preset to 1 hit per target. **Penalties ON/OFF**: Penalties ON will add 1 second to the drill time for every missed target. Penalties OFF ignores the misses and records only elapsed time. **Default values**: In one click resets the scene to default Casino Drill setting - Normal Difficulty + Target Count 6 + Target Size 1,0 + Endurance 1 +Penalties ON. **Home**: Directs back to the Home page with drill selection. **Start**: Starts the drill. Note that the drill can also be started with a random shot at the scene. If it doesn't start at a random shot, go to Home page, open the Settings dialog, and check General setting 'Shoot to start' ON. # CQB Arena 1 & 2 [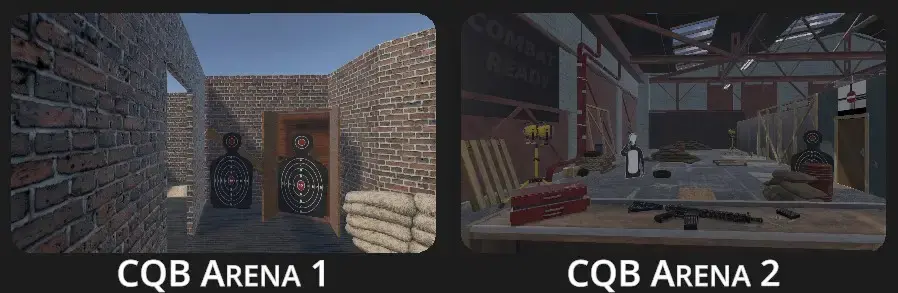](https://docs.helioninteractive.com/uploads/images/gallery/2025-07/cqbheader.webp)Drills Description:
CQB Arena 1&2 present dynamic drill in a confined indoor warehouse with open rooms and narrow corridors. Silhouette targets appear unexpectedly from various positions. Some targets are armed threats; others are non-threats requiring quick judgment. The drill builds accuracy, reaction speed, and shoot/no-shoot decision-making. It is designed to enhance close-quarters combat skills in a realistic environment where each run is unique.Configuration:
[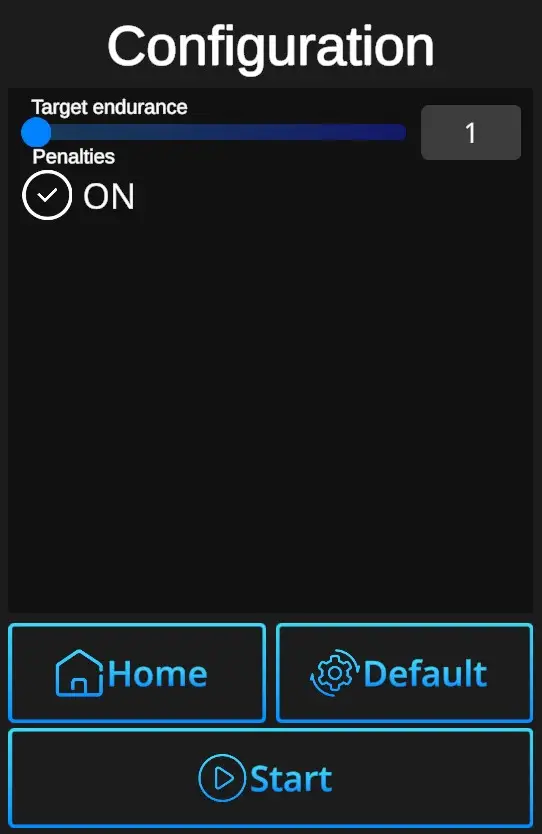](https://docs.helioninteractive.com/uploads/images/gallery/2025-07/cqbconfig.webp) **Target Endurance** : Sets required number of hits to remove the target (1-5). There are two shoot targets and one no-shoot (unarmed) target. ---| [](https://docs.helioninteractive.com/uploads/images/gallery/2025-07/cqbdrillguide.webp) | Drill guide appears at the beginnig of each CQB drill, but only if the main setting -> Home-Settings-Auto drill guide control is ON. For experienced players Auto drill guide setting OFF would be satisfactory. |
| [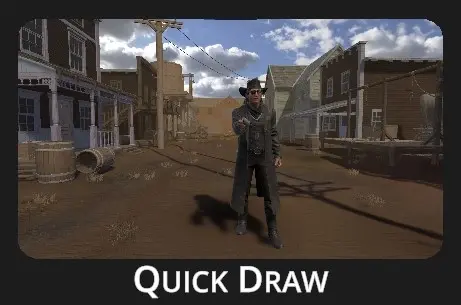](https://docs.helioninteractive.com/uploads/images/gallery/2025-07/quickdrawheader.webp) | ##### Face Cody the cowboy in a classic duel stance - when his arm moves to draw, so must you. Be ready, he gets quicker with each round! ##### Thrilling way to train focus, control, quick reaction time, weapon handling, and shooting accuracy. ##### |
Drill description:
Cody the Cowboy is ready to challenge anyone to a duel. The settings allow you to choose the distance, difficulty mode, and other options. The principle is simple: the duel runs in rounds. Watch Cody closely—when he starts raising his gun, it's time to draw and shoot. If Cody is hit before he raises his gun, he loses the round and falls. With each round, his reaction time improves by fractions of a second. The drill ends when Cody raises his arm before he's hit. Make sure you don't shoot too early! The drill will stop prematuraly and Cody won't be the one who loses.Configuration:
[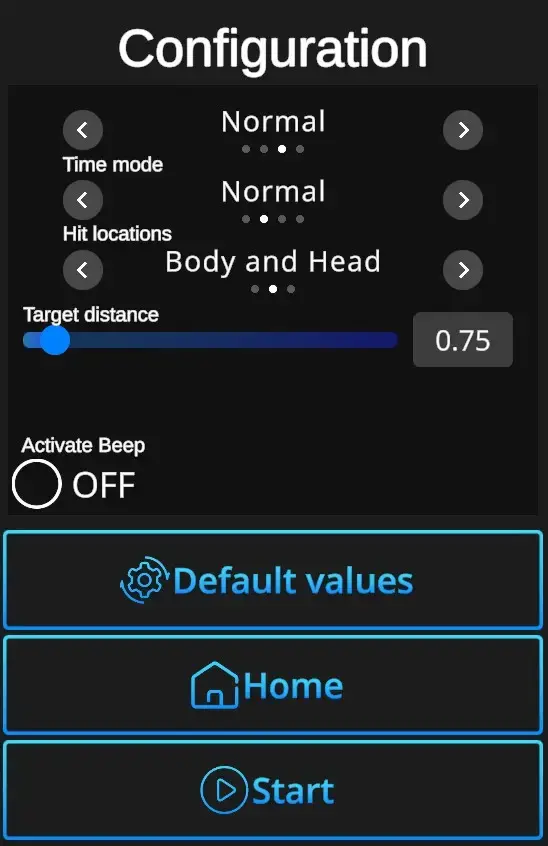](https://docs.helioninteractive.com/uploads/images/gallery/2025-07/quickdrawconfig.webp) **Difficulties**: Custom, Easy, Normal, Expert - refer to [Difficulties](https://docs.helioninteractive.com/books/range-1/page/difficulties "Difficulties") **Time mode**: Define the available reaction time in the beginning of the drill. Easy - starts at 3 seconds then each round gets quicker in decrements of 0,5s, 0,2s, 0,1s, and finally 0,05s. Normal - starts at 2 seconds then each round gets quicker in decrements of 0,25s, 0,15s, 0,1s, and finally 0,05s. Expert - starts at 1,2 seconds then each round gets quicker in decrements of 0,1s and 0,05s. Insane - starts at 0,7 seconds then each round gets quicker in decrements of 0,05s. **Hit locations**: Determines which parts of the cowboy's body count as valid hit areas — options include everything (head and body), head and body only, or head only. **Target distance**: Sets the distance from which the cowboy shoots, adjustable in 0.05 increments within a range of 0.00 to 10.00. **Activate beep** ON/OFF: Turning ON enables a beep sound when Cody begins raising the gun. Turning OFF disables the beep, leaving only a visual indication. **Default values**: In one click resets the scene to default setting - Difficulty Normal + Time Mode Normal + Hit locations Body and Head + Target distance at 0,75 + Activate Beep OFF. **Home**: Directs back to the Home page with the drill selection. **Start**: Starts the drill. Note that the drill can also be started with a random shot at the scene. If it doesn't start at a random shot, go to Home page, open the Settings dialog, and check General setting 'Shoot to start' ON. # Multiplayer| [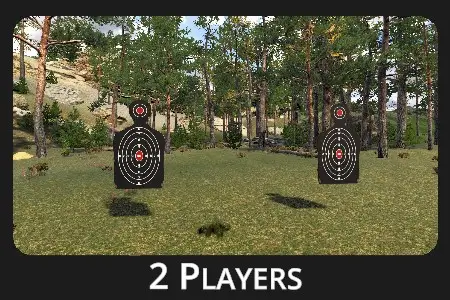](https://docs.helioninteractive.com/uploads/images/gallery/2025-07/2players.webp) | ##### Competetive shooting ##### Shooting side by side adds pressure and sharpens focus, creating a competitive environment. |
Drill Description:
Two players compete by shooting at bullseye or silhouette targets. Each shooter uses a different calibration profile based on the laser weapon used. The distance and number of shots are set before each round.Configuration:
[](https://docs.helioninteractive.com/uploads/images/gallery/2025-07/multiplayerconfig.webp) **Difficulties** : Custom, Easy, Normal, Expert - refer to [Difficulties](https://docs.helioninteractive.com/books/range-1/page/difficulties "Difficulties") **Left player calibration** : Sets calibration profile used for the player on the left side. See [Calibration](https://docs.helioninteractive.com/books/range-1/page/calibration "Calibration") for details. **Right player calibration** : Sets calibration profile used for the player on the right side. See [Calibration](https://docs.helioninteractive.com/books/range-1/page/calibration "Calibration") for details. **Shots** - Set number of shots per drill (1-20). **Default** - In one click resets the scene to default Multiplayer setting - Normal Difficulty + Left player calibration Player 1+ Right side calibration Player 2 + Shots 10 + Distance 4,0 + Silhouette target. **Change target** - Selects type o target - Bullseye or Silhouette. **Home**: Directs back to the Home page with the drill selection. **Start**: Starts the drill. Note that the drill can also be started with a random shot at the scene. If it doesn't start at a random shot, go to Home page, open the Settings dialog, and check General setting 'Shoot to start' ON. # AnalysisAnalysis is available for every drill, allowing you to review performance shot by shot or view all hit locations combined on a single target.
---| The Analysis window can be automatically prompted after each drill by enabling 'Auto Analysis' under Home > Settings > General. | [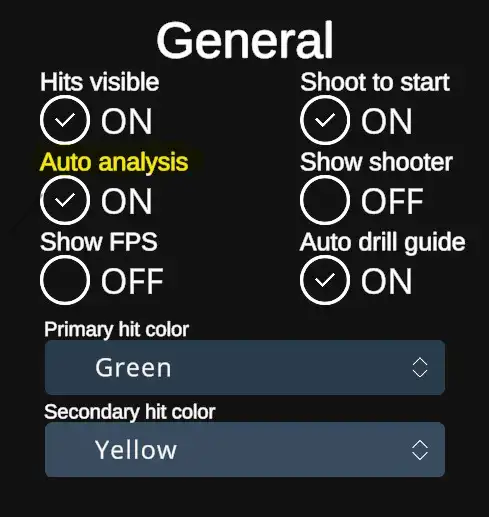](https://docs.helioninteractive.com/uploads/images/gallery/2025-07/generalsettingsautoanalysis.webp) |
| When the Auto Analysis option is turned off, the analysis won't appear automatically, but it can be accessed after each drill by tapping the Analysis button in the End menu. | [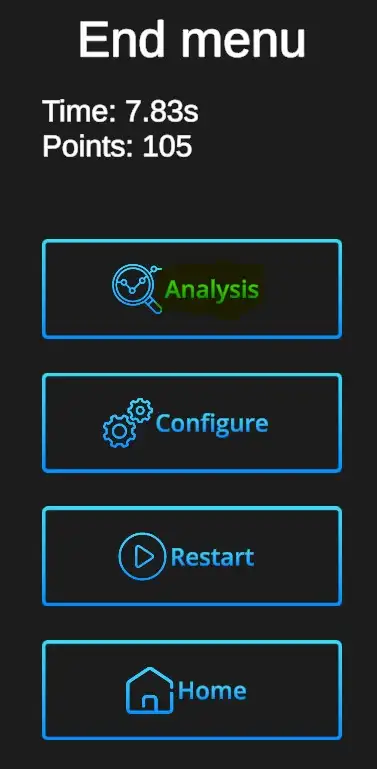](https://docs.helioninteractive.com/uploads/images/gallery/2025-07/endmenuanalysis.webp) |
Analysis window
[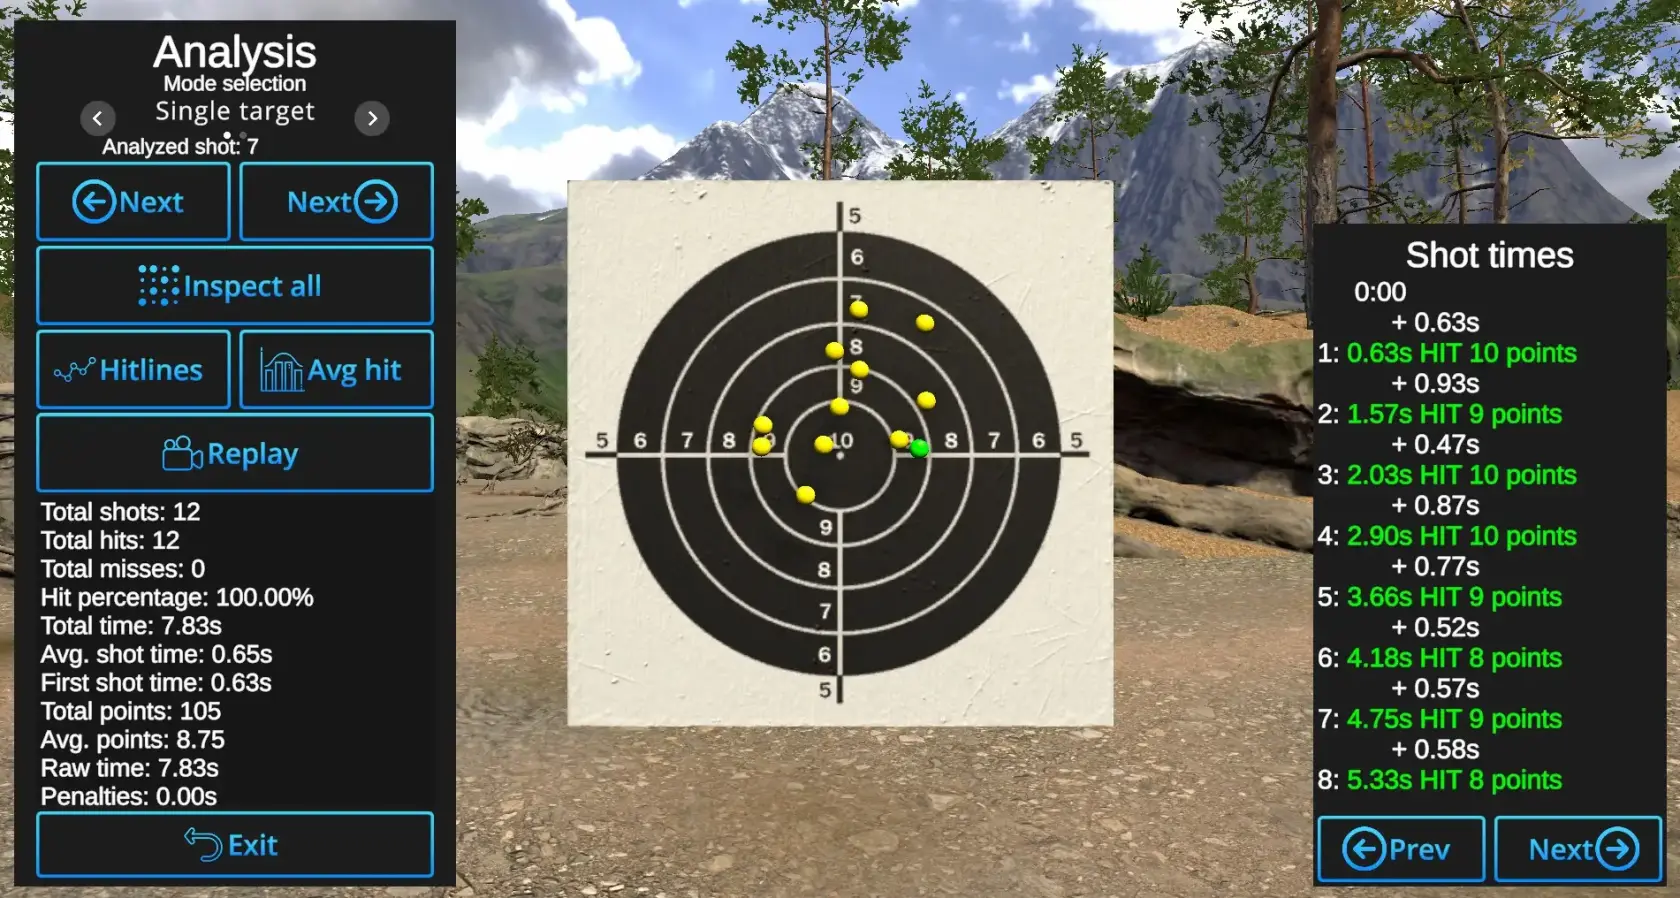](https://docs.helioninteractive.com/uploads/images/gallery/2025-07/analysis.webp) **Shot-by-Shot inspection**: Arrows with 'Next' show the hits one by one. Currently reviewed shot will be shown in Primary hit color. **Inspect all**: When enabled, all hits are displayed. The currently reviewed hit is highlighted in the Primary Hit color, while the others appear in the Secondary Hit color. When disabled, only the currently reviewed shot is shown; all other hits remain hidden. **Hitlines:** Shows connecting line between the hits in the order of hits. **Avg hit**: Displays the central point of all hits.Example: Average hit shown in blue with Hitlines visible and Inspect all active:
[](https://docs.helioninteractive.com/uploads/images/gallery/2025-07/analzsisaveragehit.webp) **Replay**: Automatically replays hit locations one by one in the order they occurred, from first to last. Other information is available under the Replay button and on the right side of the slide, where shot times and score are analyzed shot by shot. Use the Previous and Next buttons to navigate between individual shots when a drill contains more than 8 shots. --- **Exit:** Closes the Analysis view and returns to the current drill. --- # DifficultiesPreset Difficulties will help to reset drills' setting in one simple step.
The settings are controlled using the arrows on the first line of each drills' configuration tab:| [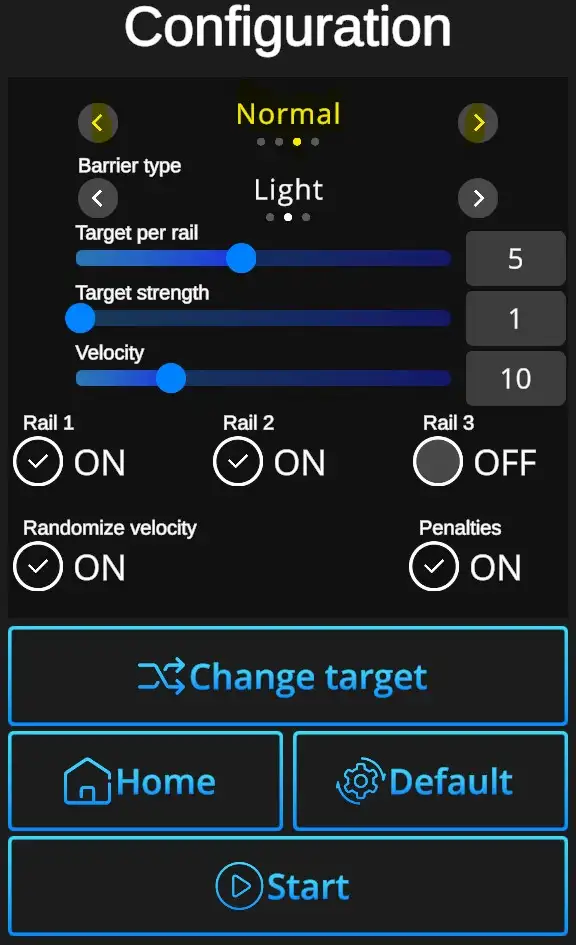](https://docs.helioninteractive.com/uploads/images/gallery/2025-07/difficultiesconfig.webp) | [](https://docs.helioninteractive.com/uploads/images/gallery/2025-07/difficultycustom.webp) Is automatically selected anytime a non-standard setting is chosen. Allows for further customization. |
| [](https://docs.helioninteractive.com/uploads/images/gallery/2025-07/difficultyeasy.webp) Settings suitable for less experienced shooters. | |
| [](https://docs.helioninteractive.com/uploads/images/gallery/2025-07/difficultynormal.webp) Setting suitable for regular training. | |
| [](https://docs.helioninteractive.com/uploads/images/gallery/2025-07/difficultyexpert.webp) Setting suitable for experienced shooters. |
Scoreboard Entries:
Each drill has its own scoreboard. When a performance meets the criteria for registration, a dialog box appears prompting the user to register the shooter and their performance: [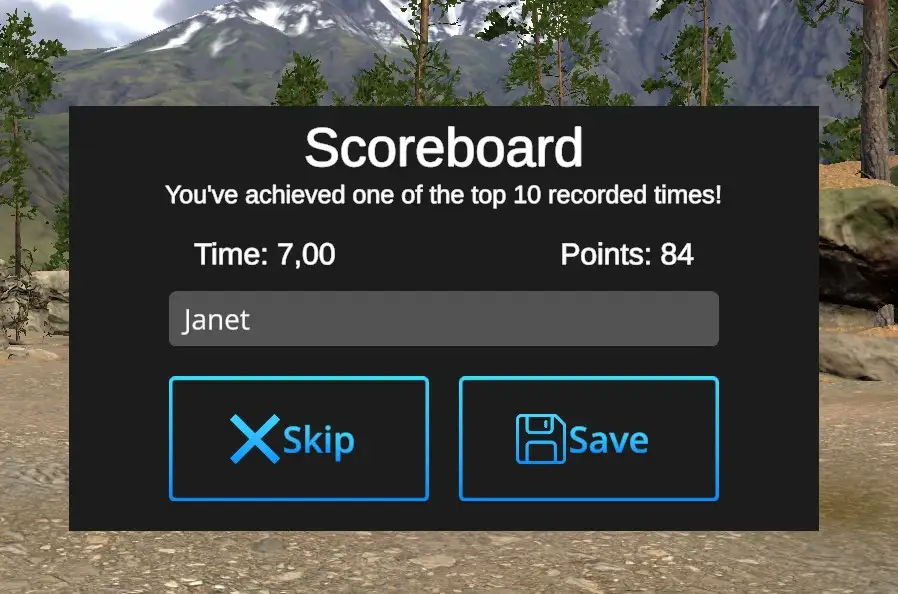](https://docs.helioninteractive.com/uploads/images/gallery/2025-07/scoreboard-ft-webp.webp) When you don't want to save the achieved performance results, hit the button 'Skip' and continue your practice. You want to save the achieved performance results - Use computer keyboard to type in your name or nickname, the score is recorded automatically. Hit 'Save'. Actual Scoreboard will be prompted:Scoreboard Overview:
The Scoreboard overview is accessible from the Home page - Scoreboard: [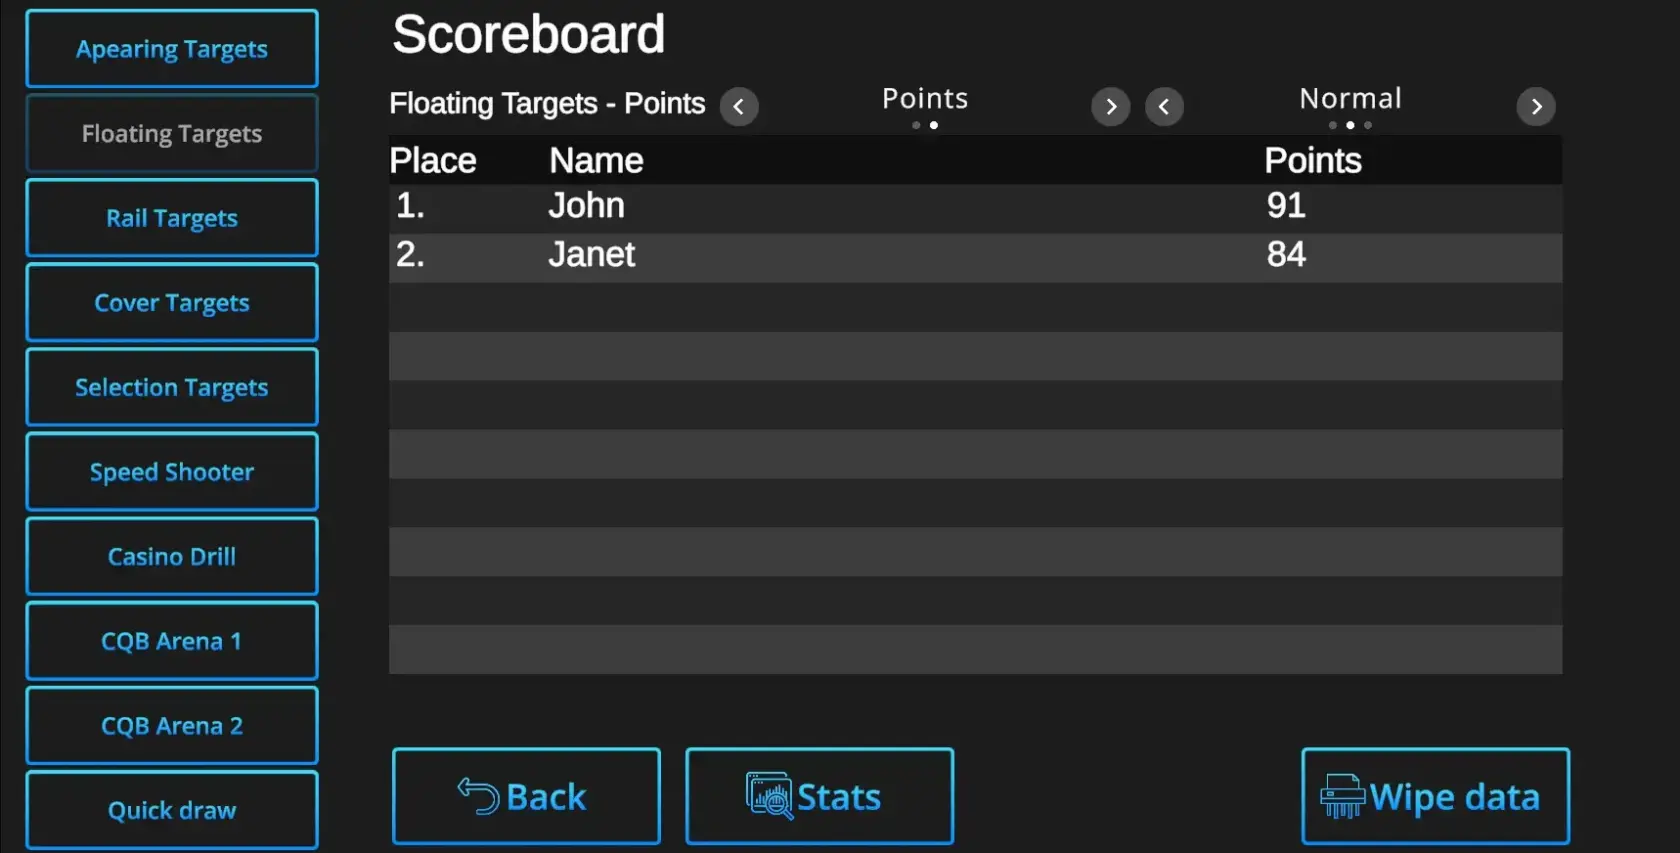](https://docs.helioninteractive.com/uploads/images/gallery/2025-07/scoreboard-ft-all-pts-webp.webp) Each drill has its own bookmark - whichever drills' scoreboard can be accessed by clicking (shooting at) the relevant bookmark button. Switches between results based on Points or Time as well as between various Difficulty modes are available above the list of scorers. --- **Stats** button - prompts overview of overall usage of the Range 1. [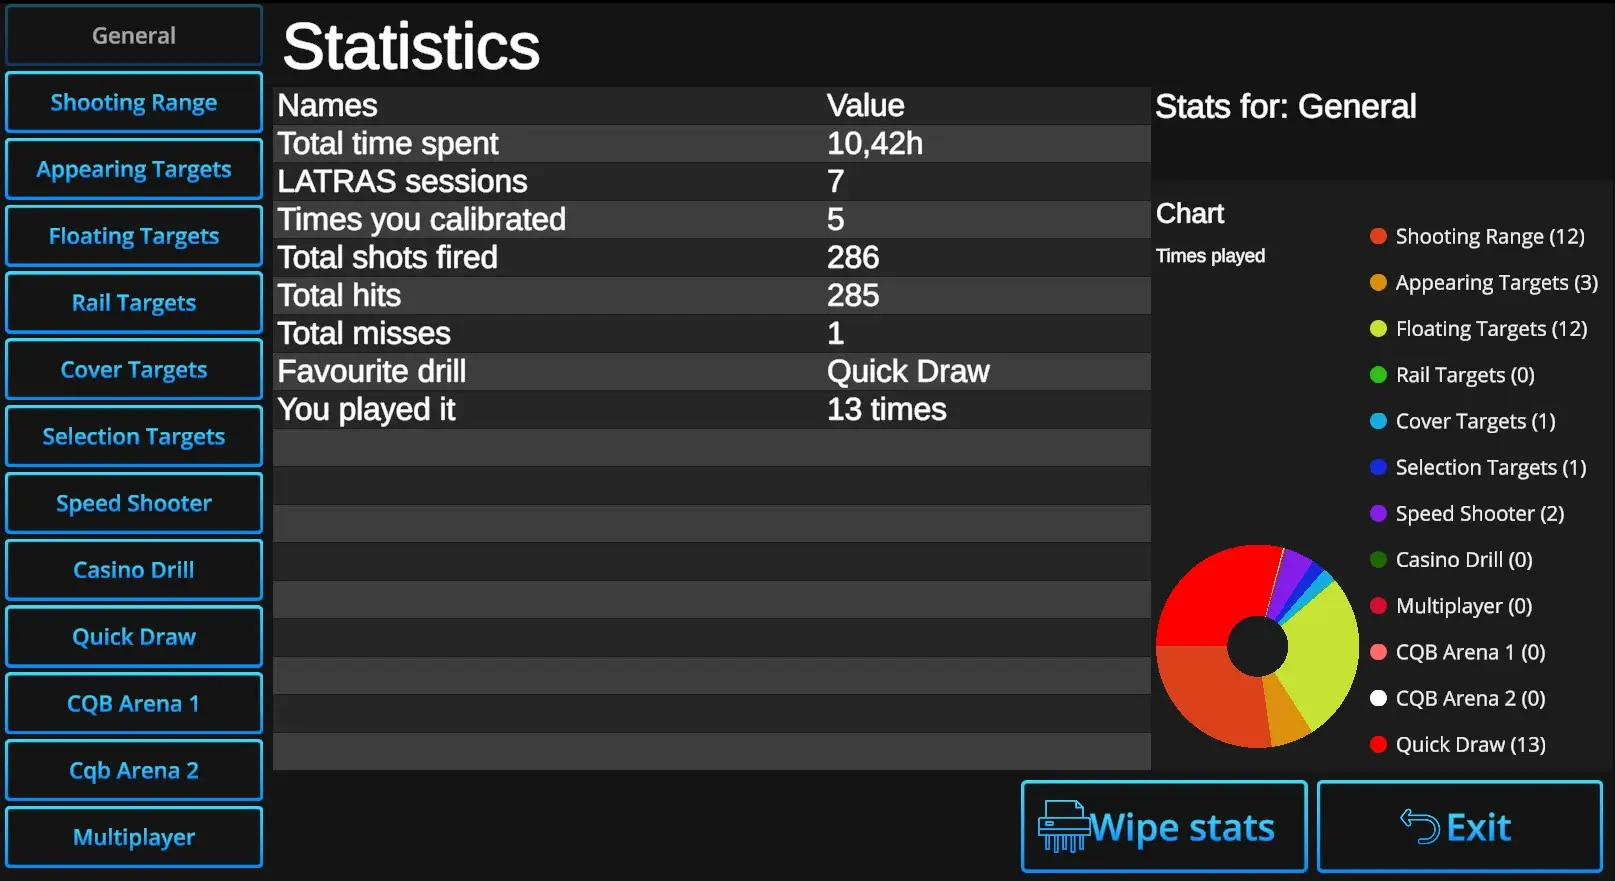](https://docs.helioninteractive.com/uploads/images/gallery/2025-07/stats-webp.webp)**Wipe stats:** When selected and confirmed, all Statistics data including Scoreboards will be erased.
--- **Exit:** Return to Scoreboard dialog. --- # Penalties Penalties enhance the competitive aspect of each drill, motivating shooters to prioritize not just speed, but—more importantly—accuracy.Each shot that misses target adds 1 second penalty to the drills' time.
[](https://docs.helioninteractive.com/uploads/images/gallery/2025-07/penaltieson.webp) Penalty setting is available for following drills: Appearing Targets Floating Targets Rail Targets Cover Targets Selection Targets Casino Drill CQB Arena 1 & 2 # Calibration The calibration procedure is recommended before introducing a new laser weapon, assigning a new shooter, or changing the shooting position. It is necessary to ensure proper alignment of the laser beam with the gun’s mechanical and optical axes. Range 1 allows up to 10 different calibration profiles to be saved and used throughout the practice for either of the drills. --- [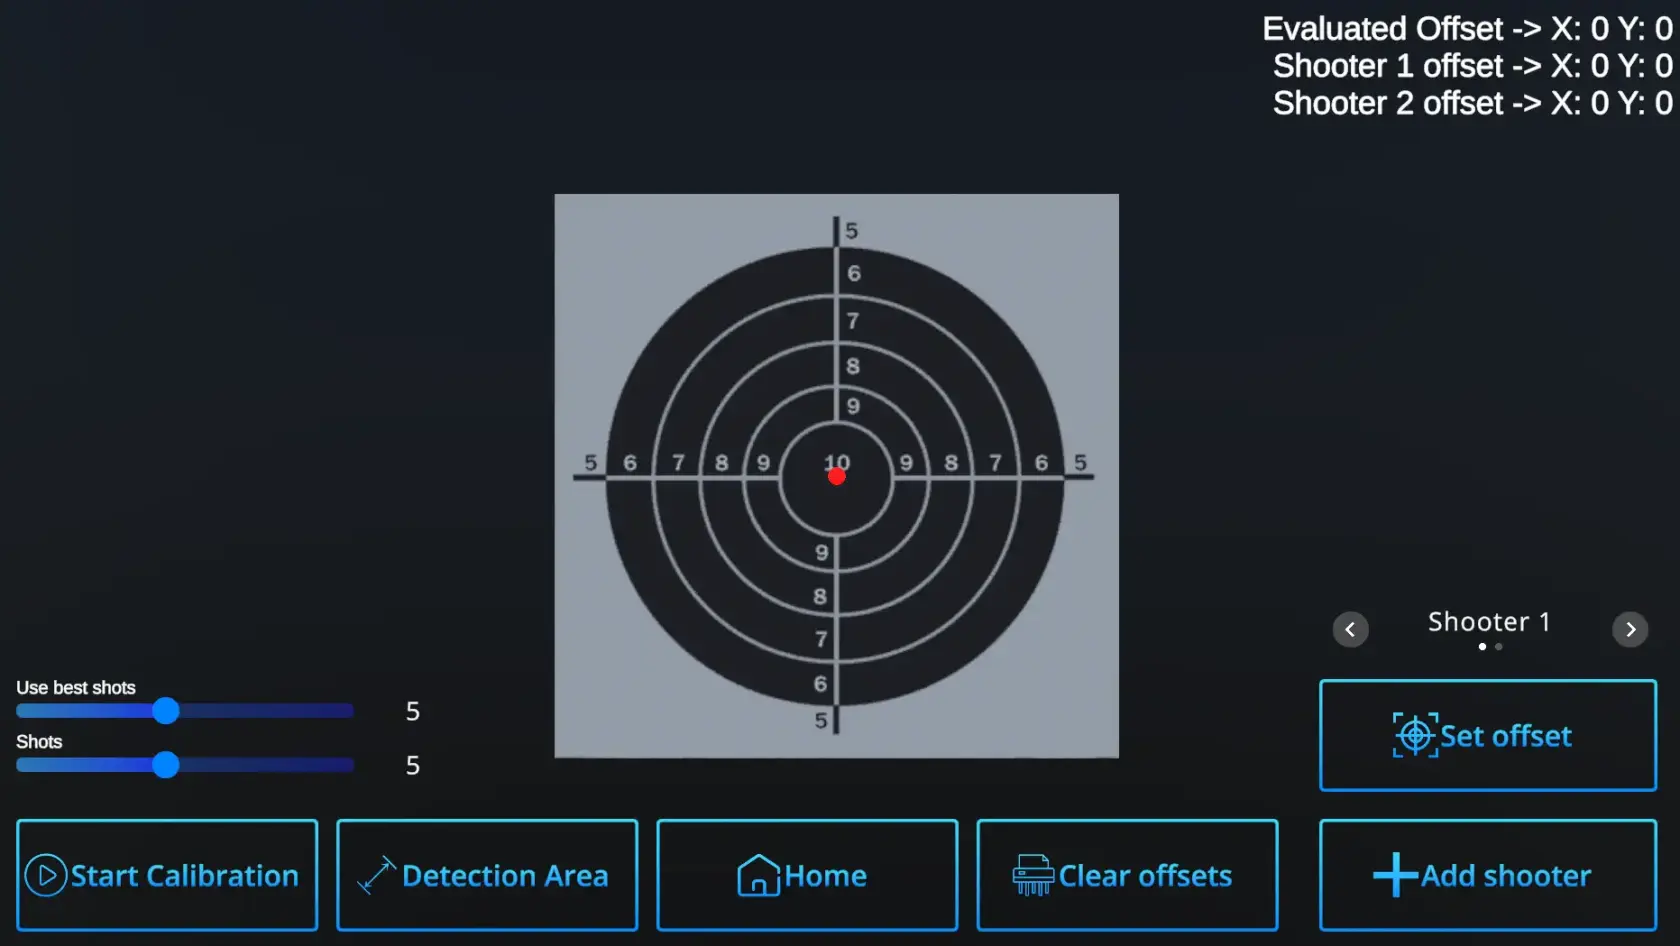](https://docs.helioninteractive.com/uploads/images/gallery/2025-07/calibrationmain-webp.webp)Start the Calibration by selecting values of Use best shot and Shots, or use default values 5 + 5.
--- **Use best shots :** Sets number of shots used to calculate the offset from true 10. Default value is 5 best shots, but can be up to 10 shots. **Shots** : Sets number of recorded shots. Maximum is 10, default number is 5. Example : Use best shots value - 5, Shots value - 10 Even if selected number of **Shots** is 10, the **Use best shots** setting will ensure that only 5 best are used for calculation of the offset. ---**If there are more shooters, use +Add shooter and see how their info appears in the upper right corner.**
**[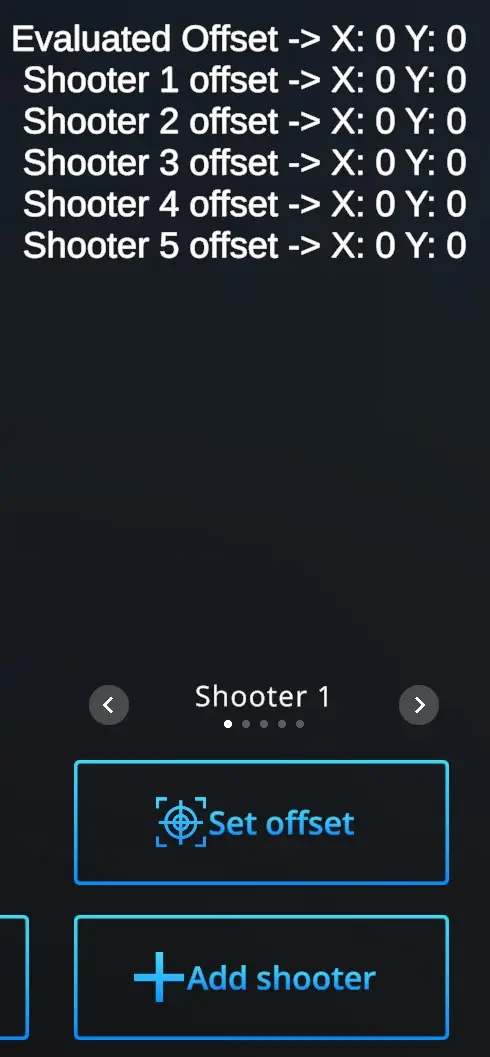](https://docs.helioninteractive.com/uploads/images/gallery/2025-07/addshooter-webp.webp)** Up to 10 Shooters can have their specific calibration data saved. The slider above Set offset selects active Shooter (Shooter 1, Shooter 2 ... Shooter 10) for whom is the calibration performed at the moment.Every time you start calibration, ensure that it is performed for the correct shooter.
**Start calibration :** Shoot at the target aiming at the center. The offset will be shown in the upper right corner on the first line as **Evaluated offset.** - you are not satisfied and want to try again - hit **Start calibration -** and perform the shots again - you are satisfied with the shot location on the target and the Evaluated offset- hit **Set offset** The offset will be shown next to the **Player 1 offset** expressed by the shift coordinates. Repeat for each of the Players.Note that each laser gun, each trainee, and each location should be calibrated separately.
**Clear offsets** : Offsets can be calibrated for each Player separately. On a slide above the Set offset button, Choose Player whom to change the offset, than hit **Clear offset** button and X=0, Y=0 appears next the the relevant Player. Then go through the Calibration process to get the new offsets. --- **Detection area :** Sets detection area of the camera. For more information, refer to XXX --- **Home** - returns to the Home page with drill selection. ---